In this vide I am going to tell you the step by step process on How to Installing Pega Platform 8.5 with Tomcat and PostgreSQL.
Prerequisite
- Download the 116916_Pega8.52.zip from Pega via My Digital Software Delivery

2. Download the PostgreSQL Database, I have downloaded 9.6 for my windows 64-bit operating system.

3. Download & Install Java and JDK.

4.Download PostgreSQL JDBC Driver (You can download the jar from Stack Builder also)

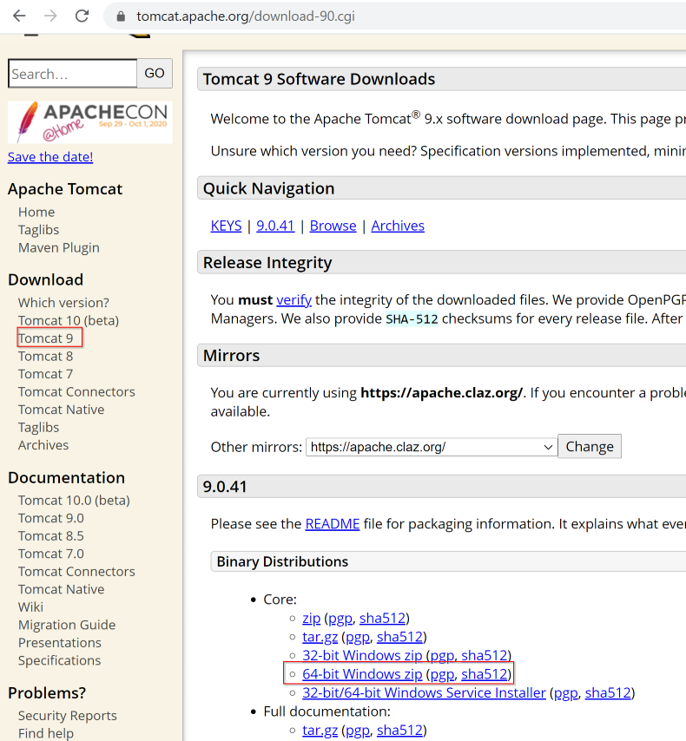
5.Download and Install Apache Tomcat Server
If you are unsure on How to Install and Configure PostgreSQL, Java, jdk and Apache Tomcat Server, then pause this video right here, and watch below videos on my channel.
Follow the below steps one by one to install and configure PEGA Platform 8.5 with Tomcat and PostgreSQL
Step 1: set JAVA_HOME, JRE_HOME, Path environment variable

Step 2: Create database user by using PostgreSQL tools

- Right-click Login Roles and select New Login Role.
- In the Role Name field, enter the name for your database user.
- On the Definition tab, enter the password for this user.
- On the Role Privileges tab, grant permissions to this user. ØClick OK.
Step 3: Create an empty database

- Right-click Databases and select New Database.
- In the Name field, enter the name of the new database to create.
- In the Owner drop down box, select the database user.
- Click OK to create the database.
Step 4: Create the primary schemas
- Under the database name, right-click Schemas and select New Schema.
- On the New Schema window, in the Name field, enter the schema name in lowercase letters.
- Use the Owner drop-down list to select your database user.
- On the Privileges tab, select ALL, click Add/Change and select the privileges to grant to the database user.
- Add the schema to the search path:
- .In the Databases section, right-click your database name and select Properties.
- Select Variables.
- In the Variable Name field, select search_path.
- In the Variable Value field, specify both the primary schema and the database schema. dataschema,rulesschema
- Click Add/Change.
- Click OK to add the variable.

Step 5: Installing PL/Java on Windows for Java user-defined functions
- Install Microsoft Visual C++ (MSVC) runtime integrated development environment from the Microsoft Windows site. Install MSVC even if it is already installed.

- Restart your computer
- Copy the following files from ResourceKit\PLJava\9.x\Windows to the PostgreSQL_Home\lib\directory.
• pljava.dll
• pljava.jar

- Configure the PostgreSQL virtual machine and library options:
- Open postgresql.conf in the PostgreSQL data directory and navigate to the end of the file.
- Enter a line similar to the following to add the classpath; use the double slash marks for the entire path name in the classpath as shown: pljava.classpath=’PostgreSQL_Home\\lib64\\pljava.jar’
- Optional. Enter a line similar to the following to set the virtual machine options:
- pljava.vmoptions = ‘-Xms32M -Xmx64M -XX:ParallelGCThreads=2’
- Enter the following line to set the working memory size:
- work_mem = 5MB
- At the end of the file, enter a line similar to the following to set the library location from step 4; use the double slash marks for the entire path name as shown:
- pljava.libjvm_location = ‘%JRE_HOME%\\bin\\server\\filename’
- Save and close postgresql.conf.
- Stop and restart the PostgreSQL service.
- After completing changes, it looks like below

Step 6: Creating secondary schema for Java user-defined functions
- Open the install.sql file in the ResourceKit/PLJava/9. x/OS / directory in a text editor. You will copy the contents of this file into the PostgreSQL tool in a later step.
- In pgAdmin, select the database in which you plan to install PL/Java.
- Open SQL query tool, paste the contents of the install.sql file into the pgAdmin editor.
- Click Execute pgScript.
- Verify that there are no error messages. If there is an error, check the library directory settings and restart the PostgreSQL service.
After successful completion of the script execution, you will see sqlj schema will be created with tables and views

How to Installing Pega Platform 8.5 with Tomcat and PostgreSQL
Step 7: Installing Pega Platform
Installing by using the Installation and Upgrade Assistant (IUA)
1.Double-click the PRPC_Setup.jar file to start the IUA.
2.Click Next to display the license agreement.
3.Review the license agreement and click Accept.
4.On the Installer Mode screen, choose Installation and click Next.
5.Choose your database type and click Next.
6.Choose Standard Edition and click Next.
7.Configure the database connection. The JDBC drivers allow the Pega Platform application to communicate with the database.
8.Click Test Connection. If the connection is not successful, review your connection information. Correct any errors, and retest. When the connection is successful, click Next.
9.System Name – Enter the name of your Pega Platform system.
10.Production Level – Enter a production level. The production level affects many security features of your system. Both the system name and production level can be changed after the system is running.
11.Click Start to begin loading the rulebase. Logs display in the log window and are also stored in the \scripts\logs directory.

Click Back to return to the previous screen, and then click Exit to close the IUA.

Step 8: Configuring your application server
1.Ensure that your database JDBC jar file is accessible to Tomcat by saving it to the lib directory on your application server

2.Open the context.xml file and locate the <context> element. You will add all Pega Platform entries to the <context> element.

3.Save and close the context.xml file.
4.Start the server to make these changes effective.
Add the required roles, users, and passwords to the tomcat-users.xml file:
1.Open the tomcat-users.xml file in the Tomcat_home /conf/ directory.
2.Add the following lines anywhere in the file body:
<user username=”admin” password=”admin” roles=”admingui,managergui, PegaDiagnosticUser”/>
3. Save and close the file.
Setting JVM parameters on Tomcat
•Initial Heap Size (Xms) — Between 4 GB
•Maximum Heap Size (Xmx) — Between 4 GB – 8 GB
Add a headless AWT setting to the Java options to allow the Pega Platform to render and display graphics
-Djava.awt.headless=true
In a single node cluster, set the node type to Universal
-DNodeType=Universal

Step 9: Deploying the Pega Platform file prweb.war
1.Copy the prweb.war file from the \archives\ directory to the Tomcat_home\webapps\ directory.
2.Restart the application server.
3.Shut down the server and delete the prweb.war file from the Tomcat_home\webapps\ directory to prevent Tomcat from redeploying the application each time the server restarts.
Step 10: Login to Pega application
Starting Pega Platform
Ensure that the application server is running and start prweb.
1.Navigate to the PRServlet URL, replacing the server and port values with your specific values.
2. Use the following credentials to log in the first time:
• User ID — administrator@pega.com
• Password — the password you set when you installed
Thank you for reading this article. Hope you learned How to Installing Pega Platform 8.5 with Tomcat and PostgreSQL on windows 10 operating system.