How To Install PEGA Platform 8.5 with Tomcat Oracle 19c

In This Tutorial we are going learn about How To Install PEGA Platform 8.5 with Tomcat Oracle 19c Database

If you want learn how to install pega platform 8.5 with Tomcat and PostgreSQL you can check out here

Prerequisite

1.Download the 116916_Pega8.52.zip from Pega via My Digital Software Delivery

2.Download and Install Oracle 19c database and install on your computer. If you are not sure how to download and install oracle database on your computer, watch below video in my YouTube channel.

3.Download Oracle JDBC Driver jar (ex: ojdbc8.jar)

oracle jdbc driver jar file

Click Here to navigate to download page

5.Download and Install Apache Tomcat Server

Click Here to navigate to download page

Step 1: set JAVA_HOME, JRE_HOME, Path environment variable

If you are unsure on How to Install and Configure Java, jdk and Apache Tomcat Server, then pause this video right here, and watch below videos on my channel.

Step 2: Configuring your database for localization

Oracle supports two types of character semantics, BYTE and CHAR. CHAR supports international character sets. To support localization, set Oracle semantics to CHAR.

alter system set NLS_LENGTH_SEMANTICS=CHAR scope=both;
alter session set NLS_LENGTH_SEMANTICS=CHAR;

You can run below query to verify

SELECT value From V$PARAMETER WHERE NAME LIKE '%nls_length_semantics%';
Step 3: Creating Oracle users/Schemas
alter session set "_ORACLE_SCRIPT"=true;

Rules Schema

CREATE USER mypegarules IDENTIFIED BY oracle DEFAULT TABLESPACE USERS QUOTA UNLIMITED ON USERS;

Data Schema

CREATE USER mypegadata IDENTIFIED BY oracle DEFAULT TABLESPACE USERS QUOTA UNLIMITED ON USERS;

Grant privileges

grant all PRIVILEGES to mypegarules;
grant all PRIVILEGES to mypegadata;

Step 4: Installing Pega Platform

Installing by using the Installation and Upgrade Assistant (IUA)

1.Double-click the PRPC_Setup.jar file to start the IUA.

2.Click Next to display the license agreement.

3.Review the license agreement and click Accept.

4.On the Installer Mode screen, choose Installation and click Next.

5.Choose your database type and click Next.

6.Choose Standard Edition and click Next.

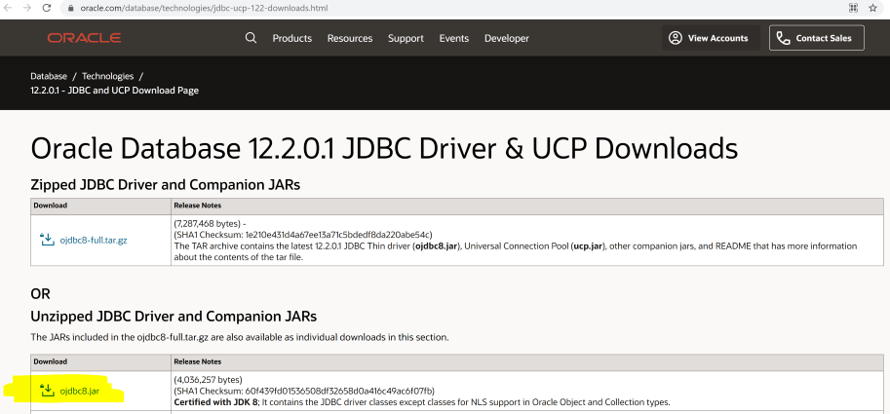
7.Configure the database connection. The JDBC drivers allow the Pega Platform application to communicate with the database.

8.Click Test Connection. If the connection is not successful, review your connection information. Correct any errors, and retest. When the connection is successful, click Next.

9.System Name – Enter the name of your Pega Platform system.

10.Production Level – Enter a production level. The production level affects many security features of your system. Both the system name and production level can be changed after the system is running.

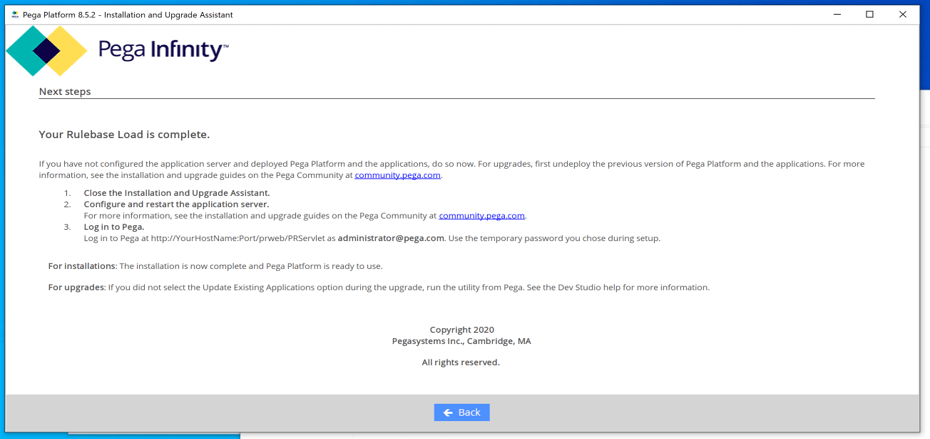
11.Click Start to begin loading the rulebase. Logs display in the log window and are also stored in the   \scripts\logs directory.

pega installation rule base load complete

Click Back to return to the previous screen, and then click Exit to close the IUA.

pega install oracle 19c
Step 5: Configuring your application server

1.Ensure that your database JDBC jar file is accessible to Tomcat by saving it to the lib directory on your application server

2.Open the context.xml file and locate the <context> element. You will add all Pega Platform entries to the <context> element.

3.Save and close the context.xml file.

4.Start the server to make these changes effective.

Resource name="jdbc/PegaRULES" auth="Container" type="javax.sql.DataSource" maxTotal="100" maxIdle="30" maxWaitMillis="10000" driverClassName="oracle.jdbc.OracleDriver" url="jdbc:oracle:thin:@localhost:1521/pegadb" username="sys as sysdba" password="oracle"

Environment name="prconfig/database/databases/PegaRULES/defaultSchema" value="mypegarules" type="java.lang.String"

Environment name="prconfig/database/databases/PegaDATA/defaultSchema" value="mypegadata" type="java.lang.String"

Environment name="url/initialization/explicittempdir" value="C:\PegaEnterpriseEdition\temp" type="java.lang.String"

Save and close the context.xml file.

Add the required roles, users, and passwords to the tomcat-users.xml file:

1.Open the tomcat-users.xml file in the Tomcat_home /conf/ directory.

2.Add the following lines anywhere in the file body:

  <user username=”admin” password=”admin” roles=”admingui,managergui,   PegaDiagnosticUser”/>

  1. Save and close the file.

Setting JVM parameters on Tomcat

Initial Heap Size (Xms) — Between 4 GB

Maximum Heap Size (Xmx) — Between 4 GB – 8 GB

Add a headless AWT setting to the Java options to allow the Pega Platform to render and display graphics

-Djava.awt.headless=true

In a single node cluster, set the node type to Universal

-DNodeType=Universal

Step 6: Deploying the Pega Platform file prweb.war

1.Copy the prweb.war file from the \archives\ directory to the Tomcat_home\webapps\ directory.

2.Restart the application server.

3.Shut down the server and delete the prweb.war file from the Tomcat_home\webapps\ directory to prevent Tomcat from redeploying the application each time the server restarts.

Step 7: Login to Pega application

1.Navigate to the PRServlet URL, replacing the server and port values with your specific values.

  http://server:port/prweb

  1. Use the following credentials to log in the first time:
  • User ID — administrator@pega.com
  • Password — the password you set when you installed

Hope you learned about How To Install PEGA Platform 8.5 with Tomcat Oracle 19c Database

if you have any further questions feel free to contact admin@pegaks.com

Leave a Reply

Your email address will not be published. Required fields are marked *